The mysterious blue suitcase.. collecting dust..
This is the final destination, get it or bust!
The mysterious blue suitcase.. collecting dust..
This is the final destination, get it or bust!


Instructions:
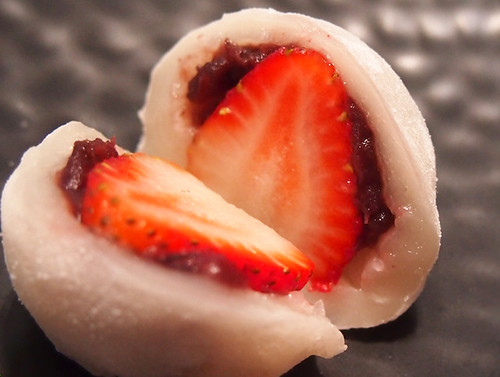
Note: For a plain red bean mochi, the red bean is normally a bit tooooo soft to play with. It'll be better to chill a slab in the freezer and then cut them into bite size chunks and then wrap in the warm sticky glutinousy goodness.
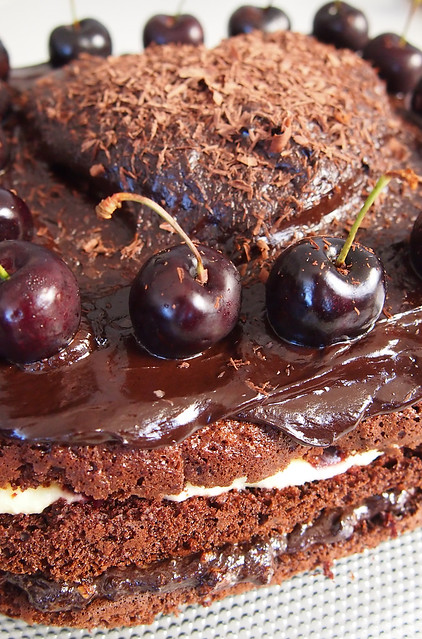
For the chocolate sponge
7 eggs
250g caster sugar
200g plain flour
50g cocoa powder
2 tsp baking powder
1 tsp vanilla extract
For the candied cherries
½ cup semi-candied pitted cherries, ¼ cup juice reserved
¼ cup caster sugar
For the cherry compote
1/3 cup caster sugar
600g pitted fresh cherries, halved
1 tbs brandy
For the cherry sugar syrup
90g caster sugar
¼ cup cherry juice
1. For the chocolate sponge, preheat oven to 160°C fan forced. Grease and line 2 x 20cm springform cake pans.
2. Add eggs and sugar to a heatproof bowl of an electric mixer, and set over a saucepan of simmering water over very low heat. Whisk the mixture until 37°C. Remove the bowl from the heat and beat with an electric mixer on a medium-low speed for 5-8 minutes or until the mixture has cooled and thickened to a mousse-like consistency. Sift the flour, cocoa powder and baking powder together twice. Using a large metal spoon, fold the dry mixture into the egg mixture in 3 batches until combined, adding the vanilla extract with the first dry batch.
3. Pour the mixture into the lined cake pans and smooth surface. Bake for 20-25 minutes or until sponge springs back when lightly touched. Allow to cool for 10 minutes in the pans, then turn out onto wire racks. Place in the blast chiller for 10-15 minutes until cake has cooled completely.
4. For the candied cherries, preheat oven to 120°C. Place cherries on a lined baking tray. Lightly dust with the sugar and place in the oven for 50-60 minutes. Remove and cool. Coat with remaining sugar. Set aside.
5. For the cherry compote, add the sugar to a non-stick saucepan and place over medium heat. Once the sugar begins to dissolve add the cherries and cook until they start to release their juices. Add the brandy and cook for 10-15 minutes or until the liquid has reduced and thickened. Strain, reserving liquor.
6. For the cherry syrup, heat 170ml water and the sugar in a small saucepan and bring to the boil, stirring constantly. Remove from the heat and stir in the reserved cherry juice and compote liquor. Allow to cool.
7. For the chocolate hazelnut praline mousse, line a baking sheet. In a dry heavy-based saucepan, cook sugar over medium heat, stirring, until melted. Once melted, cook without stirring, swirling pan, until lightly golden. Add hazelnuts, stirring until well coated. Immediately pour mixture onto the baking sheet and cool completely, in blast chiller for 5 minutes. Break praline into pieces. Place into a food processor and pulse until finely chopped. Set aside.
8. Melt the chocolate in a heatproof bowl set over a pan of simmering water. Whisk the egg yolks in a small heatproof bowl. Heat 250ml of the cream in a small saucepan over low heat. Stir through half of the hot cream into the egg yolks. Return the mixture to the saucepan over low heat and stir until thickened. Strain into a clean bowl. Stir the melted chocolate into the hot custard. Add the vanilla and allow to cool. Whisk the remaining cream until stiff peaks form. Fold into the chocolate mixture with the praline, until just combined. Set aside.
9. For the mascarpone cream, beat the mascarpone, vanilla and sugar in a bowl until smooth and slightly thicker in volume.
10. For the chocolate ganache, melt the chocolate in a heatproof bowl set over a pan of simmering water. Set aside. Bring the cream to just below boiling point in a small saucepan. Remove from the heat, then add the melted chocolate and stir until smooth. Allow to cool until thick but still pouring consistency.
11. To assemble the cake, slice both cakes into thirds. Place the base of 1 cake onto a serving plate and brush with some of the cherry syrup. Spread over half of the chocolate praline mousse.
12. Place the next layer of cake onto a board, and brush with cherry syrup. Spread over half of the mascarpone cream. Divide the cherries into two parts for two separate layers. Place cherries around the border of the cake, 5mm from its edge and scatter remaining in the middle. Carefully remove layer from the board and place on top of the first layer. Repeat each layering process on the board (you will have 1 spare slice of cake), starting with the praline mousse and ending with the cherries on the mascarpone cream.
For the chocolate hazelnut praline mousse
½ cup caster sugar
½ cup hazelnuts, toasted lightly and skinned
300g chopped dark chocolate
3 egg yolks
300ml thickened cream
1 tsp vanilla extract
For the mascarpone cream
500g mascarpone
1 tsp vanilla bean paste
2 tbs icing sugar
 So, Let me start off today with the weapon of choice - A camera.